Wouldn’t the dinosaurs have loved to know? Will you too be extinct soon, well, your job anyways? Here’s a fun infographic for the day… Will your job be lost to technology and when?
Philip Sellers
Philip Sellers
Phil is a Solutions Architect at XenTegra, based in Charlotte, NC, with over 20 years of industry experience. He loves solving complex, technology problems by breaking down the impossible into tangible achievements - and by thinking two or three steps ahead of where we are today. He has spent most of my career as an infrastructure technologist in hands-on roles, even while serving as a leader. His perspective is one of servant leadership, working with his team to build something greater collectively. Having been lucky to have many opportunities and doorways opened during his career - Phil has a diverse background as a programmer, a writer, an analyst all while staying grounded in infrastructure technology.
This is part 4 in a multi-part series about 3PAR arrays from an EVA Administrator’s point of view – and specifically here, for the VMware Administrator, too. Running 3PAR StorServ with vSphere 5.1 comes with a short list of best practices from HP, which is great since VMware ESXi does most of the work for you. The best practices for EVA are the same as the best practices for 3PAR StorServ, except the IOPS count. In summary, the best practices are:
- In 3PAR Management Console, set the host persona to host persona 11/VMware if running 3PAR OS 3.1.2 or later, which ships with the StorServ 7000 series arrays.
- Set the default VMware Path Selection Policy (PSP) to VMW_PSP_RR.
- Set the default VMware Storage Array Type Plugin (SATP) to VMW_SATP_ALUA.
- Set the IOPS value for 3PAR data LUNs to a value of 100.
Create a Host Persona for the ESXi server
Using the 3PAR OS CLI, log into your 3PAR array and you will need to create a host where you can export your storage. Since this post focuses on the 3PAR StorServ 7000 series, these units ship with OS 3.1.2, so you should use host persona 11 – the VMware ALUA persona. 3PAR OS 3.1.2 includes support for asymmetric logical unit access (ALUA) and the host persona 11/VMware and new ESXi hosts should use this persona according to the HP 3PAR VMware ESX Implementation Guide, revision March 2013.
[sourcecode]createhost -persona 11 ESXiHostName WWN/iSCSI_Port_ID1 WWN/iSCSI_Port_ID2[/sourcecode]
With a host created in the 3PAR, you can now export Virtual Volumes (VV) to hosts. But before you export any LUNs from the 3PAR, you will want to configure your ESXi hosts with a default storage array type plugin and path selection policy.
Set the default SATP to VMW_SATP_ALUA and PSP to VMW_PSP_RR
With 3PAR OS 3.1.2 using host persona 11/VMware in your hosts objects on the 3PAR array, the array supports ALUA and we should set your storage type array plugin (SATP) to match by default in VMware – otherwise, you have to set this setting on each LUN presented/exported. In addition, the recommended path selection policy (PSP) is Round Robin. Most Recently Used (MRU) is also acceptable, but not the optimal path selection policy. To set this on your ESXi hosts, use the esxcli below. (If you haven’t used vSphere CLI/esxcli – see this blog post at VMware for some tips on how to provide credentials).
[sourcecode]esxcli storage nmp satp set -s VMW_SATP_ALUA -P VMW_PSP_RR[/sourcecode]
For anyone wanting a way to accomplish this in PowerCLI, you should check out Jonathan Medd’s post adapting the esxcli command to PowerCLI. If you have storage that was presented prior to setting the default, you will need to go through and set these LUNs to Round Robin from MRU, which is the out-of-box default.
[sourcecode]Get-VMHost | Get-ScsiLun -CanonicalName "naa.600*" | Set-ScsiLun -MultipathPolicy "roundrobin"[/sourcecode]
You will also need to create a custom rule to set the IOPS value on each LUN added.
[sourcecode]esxcli storage nmp satp rule add -s "VMW_SATP_ALUA" -P "VMW_PSP_RR" -O iops=100 -c "tpgs_on" -V "3PARdata" -M "VV" -e "HP 3PAR Custom iSCSI/FC/FCoE ALUA Rule"[/sourcecode]
Now for the same in PowerShell, here’s a short group of commands to accomplish the same. First, you have to connect directly to a ESX host and to a vCenter instance. Second, issue these:
[sourcecode lang=”powershell”]Connect-VIServer -Server [servername]
$esxcli = Get-EsxCli
$esxcli.storage.nmp.device.list() | where {$_.device -like "naa.600*"} | %{
$configBefore = $esxcli.storage.nmp.psp.roundrobin.deviceconfig.get($_.device)
$esxcli.storage.nmp.psp.roundrobin.deviceconfig.set(0, 1, $_.device, [long]100, "iops", $false)
$configAfter = $esxcli.storage.nmp.psp.roundrobin.deviceconfig.get($_.device)
# Uncomment the following lines if you want to report the settings
# $configBefore
# $configAfter
}[/sourcecode]
Lastly, in earlier versions of 3PAR OS, you needed to add a plugin for VAAI to ESXi in order to gain the benefits of VAAI – offloading processes directly to the array from the ESXi host. With 3PAR OS 3.1.1, it is no longer needed –
HP 3PAR VAAI Plug 2.2.0 should not be installed on the ESXi 5.x if connected to an HP 3PAR StoreServ Storage running HP 3PAR OS 3.1.1 or later, because the VAAI primitives are handled by the default T10 VMware plugin and do not require the HP 3PAR VAAI plugin.
Supporting best practices for multiple storage systems in a single VMware environment can be tough, but in my experience supporting both EVA and 3PAR in the same environment is very simple and straight forward if you’re using 3PAR OS 3.1.2. As another tip, Host Profiles work well for picking up SAN settings on a single host and applying them again the other nodes in the cluster. If you boot from SAN, you may have to go into a profile and disable some settings specific to boot LUNs on a host, but otherwise, the storage settings from the host profile should work well for replicating settings.
This is part 3 of a multipart series focused on 3PAR storage from an EVA Administrator’s perspective. Check out parts one and two – Understanding the 3PAR difference in array architecture and Learning the 3PAR lingo for the EVA administrator.
HP 3PAR Peer Persistence is the most exciting feature for me in the new 3PAR StoreServ 7000 series. I’ve referred to it has a ‘holy grail’ feature to my sales team and to our internal team at work. While its not the first to market with metro storage clustering, it brings the feature set to the 3PAR lineage and features a non-disruptive failover between the arrays. VMware officially started supporting metro storage clusters in 2011 with a limited number of storage vendors and solutions and as of posting, 3PAR does not have official support stated from VMware, but it should soon.
Peer Persistence rides on top of the Remote Copy replication feature set and uses synchronous replication. The two key pieces to the Peer Persistence solution are assigning the secondary copy the same volume World Wide Name (WWN) as the primary and the use of Asymmetric Logical Unit Assignment (ALUA) on the VMware side to recognize the active paths when a failover is invoked. To a VMware host, you see active and standby paths to the VLUN thanks to the shared volume WWN.
EVA Administrators are experienced with ALUA for finding and using the optimized active paths to a LUN. On the EVA, only one controller has true write access to the LUN and the paths to that controller are marked as “Active (I/O)” and the paths to the secondary controller are marked as “Active”. The secondary paths would not be used for IO.
Within 3PAR, Peer Persistence uses the same ALUA technology to discover the active paths to the active array and to set the paths to the target/secondary 3PAR array into StandBy mode. It is also critical in the discovery of a switchover condition where the primary paths become blocked, ALUA issues a discovery command the the Secondary array’s paths are found as active. With the 3PAR, all paths to the active array are labeled as “Active (I/O).”
Is Peer Persistence right for your environment? Let’s start with the list of requirements:
- Close proximity of your two datacenters with large pipes and low latency.
- The ability to perform synchronous Remote Copy between your 3PAR arrays in 1-to-1 configuration.
- Requirements of Synchronous Replication
- The volumes exported from primary and secondary must share the same volume WWN.
- ESX hosts must be 5.0 or higher and must be exported with host persona 11 (VMware)
Clearly, this isn’t for everyone. The fact that you must be within synchronous distances for replication is a deal breaker for many customers, but not all.
Setup Peer Persistence
Peer Persistence sets up just like any other Remote Copy scenario. I won’t cover that in this post, but I suggest you check out the HP 3PAR Remote Copy Software User’s Guide for all the details on setting up Remote Copy in various scenarios and for more details on Peer Persistence.
After you have created your Remote Copy group with virtual volumes inside and before you export the volumes to the hosts, changes for Peer Persistence are necessary. On the Primary 3PAR array, you will need to enumerate a list of the virtual volumes including their WWN. You can display this in the 3PAR CLI using the showvv command.
[sourcecode]showvv -d <vv_name>[/sourcecode]
The output should be a single line including the WWN of the virtual volume. I suggest that you highlight and copy the WWN for use in the next step.
Next you will assign the secondary virtual volume the same WWN. Open a 3PAR CLI connection to the secondary 3PAR array and in this CLI environment, you will issue a setvv command.
[sourcecode]setvv -wwn <WWN> <vv_name>[/sourcecode]
On the secondary array, issue another showvv command and confirm that the WWN on the secondary now matches the WWN on the primary.
Once you have completed the WWN assignment on the secondary volume, you may start replication and export the Virtual Volumes to the hosts. When exporting, ensure host person 11 (VMware) is used for all hosts.
Invoking a switchover
A switchover is easy. From the 3PAR CLI, a single command will allow you to switch over an entire Remote Copy group of Virtual Volumes or all Virtual Volumes with Remote Copy targeted to a specific 3PAR array. However, there are several piece of information you will want to check before issuing the switchover command.
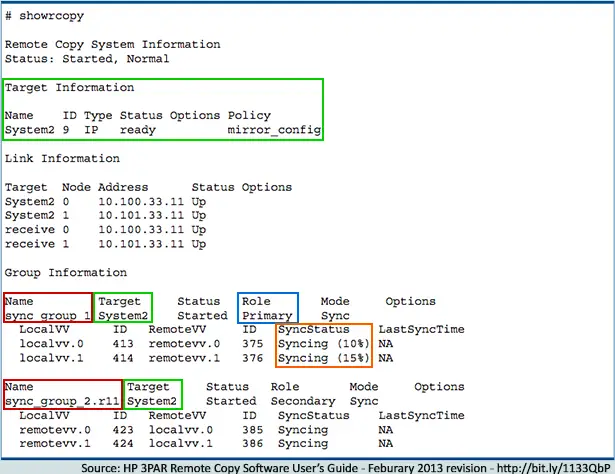
To find the names of the Remote Copy groups and/or to see which Remote Copy groups are targeted towards a particular 3PAR array, you issue the showrcopy command in the CLI. In the output, you will find the name of the Remote Copy group and the array it is targeted to replicate to. A sample of showrcopy output is below:
With the information, you can initiate a switchover from primary to secondary with no interruption in service. From a showrcopy output, you can determine which target 3PAR array is part of the synchronous replication (outlined above in green). The target name can be used to failover all Virtual Volumes hosted by this 3PAR array to the target/secondary array for those VV’s.
Otherwise, if you want to issue the The switchover is initiated from the primary array for an Remote Copy group, so you will want to look at the Role column (outlined above in blue) of the Group Information in the output. In this example, only sync_group_1 may be issued the switchover command on this 3PAR array. To failover sync_group_2, you must connect to CLI on the System2 3PAR array. To failover a Remote Copy group of Virtual Volumes, you have to issue a command using the Remote Copy Group name (outlined above in red). You should also ensure that Remote Copy is running and in Synced status by checking the SyncStatus column (outlined in orange above). In our example above, you will need to wait for syncing to complete for localvv.0 and localvv.1 before issuing a switchover command.
Failover all volumes replicating to a Target 3PAR
Taking the target 3PAR array name, outlined in the example in green, issue the following command:
[sourcecode]setrcopygroup switchover -t <target_name>[/sourcecode]
Using the output from our example, we would issue the following:
setrcopygroup switchover -t System2
Failover a particular Remote Copy Group
To switch a particular Remote Copy Group, take the remote copy group name – for instance sync_group_1 from the example above and issue this command in the 3PAR CLI:
[sourcecode]setrcopygroup switchover <group_name>[/sourcecode]
For our example with sync_group_1, you would run:
setrcopygroup switchover sync_group_1
Within a matter of seconds, the 3PAR arrays will fail from the primary to secondary and your active and standby paths will switch in VMware.
Behind the Scenes
Behind the scenes, the primary 3PAR array is in control of the synchronous Remote Copy. The primary array stops accepting IO on its interfaces, commits all writes, then swaps control to the secondary array which then opens its paths and begins accepting IO. At the same time, the VMware hosts are notified that the path is blocked and it initiates a ALUA discovery to find its active paths.
In part 4, we will focus on best practices for vSphere 5.1 with the 3PAR StoreServ 7200/7400 arrays.
Last Monday, HP released the new HP Moonshot platform, a new set of server products specifically built to take less space, less power and less operational cost than traditional servers in the datacenter. In Moonshot, HP is attempting to solve the issues data centers face today with finding ample power, finding space and cooling challenges.
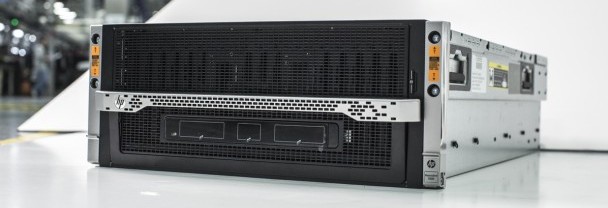
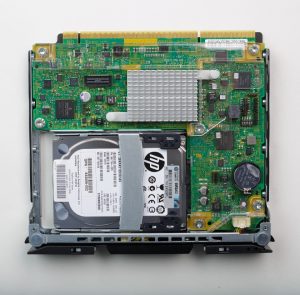
HP Moonshot is moniker used for both the chassis and the server cards inside of the chassis. It is a similar concept to the blade servers HP and other vendors have produced, replacing the blade with a server card similar to what you’d see in a switch chassis.
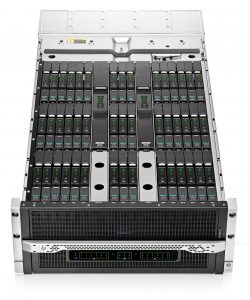 The chassis itself is an oddly sized, 4.3U server enclosure and serves as the basis for the ecosystem with 45 slots for server cards and two network switches with shared power and cooling. The card based servers are a rethink of what defines a server – a small footprint system-on-a-card based around low power processors. As for space consolidation, HP says that what previously would have occupied 10 racks of 1U servers can be accommodated in a single rack with 10 Moonshot chassis.
The first set of Proliant Moonshot Servers are based around Intel Atom processors. Being x86-based, much of the world’s current server software should work with these new servers, something that will be key to adoption of the new form factor in the datacenter. In addition to these Intel Atom processors, HP also announced plans for tailored servers for specific business needs. These servers may be stocked with specific hardware for a task and future server will include ARM processors, too. The ARM based servers will likely require a lot of rewrites of applications for compatibility, but given the amount of experienced ARM developers for mobile, its not a stretch to consider server code being written on ARM.
Oddly (to me at least), HP has a requirement that all 45 server cards be identical in an enclosure according to the QuickSpecs found online for factor integrated models (thanks to Chris Wahl for that information). At launch, there is only a single Proliant Moonshot server card available. The requirement to buy a fully populated system is a clear sign that HP is targeting the Moonshot systems towards service providers and serious datacenters running lots of web applications on traditional server hardware. It is concerning for enterprise who tend to mix and match server models in blade enclosures to fit specific needs. Moonshot’s uniform requirement may limit its audiences.
 Moonshot does not seem to be a play towards hardware for virtualization, but a play towards to scale-out Google and Facebook cloud architectures. Facebook has even gone as far as creating the Open Compute Project to help further its efforts to create low cost compute and storage nodes. It seems the goals of Moonshot may be in the same vein as Open Compute. Facebook’s idea is to scale out and replicate data across many nodes, using cheap and disposable server hardware to accommodate their workloads. Clearly, Moonshot’s server cards fit that bill.
Add to this the reduced consumption of power and that makes the relatively weaker processors more palatable for many buyers. Power may be the most expensive commodity for datacenters today and the reliance on electricity is only increasing year over year. Few companies have the resources or determination of Apple to power their datacenters with nearly 100% renewable power sources – like the Maiden,NC, datacenter. That means all other datacenters are at the mercy of the power grid and pricing from their local electricity providers.
HP Moonshot is definitely a new platform to watch. It will be interesting to see if it catches on as well as the blade servers and convergence that HP helped to usher into the industry.
VMware released vCenter Converter 5.1 Beta to the general public last month and its available for download now from the VMware VMTN Community.
As I found with my recent vSphere 5.1 upgrades, vCenter Converter 5.0 is not fully compatible with vSphere 5.1 farms and there are a number of issues. In my own experience, a conversion is extremely slow using Converter 5.0 on a vSphere 5.1 farm. Other issues were much more serious.
vCenter Converter 5.1 Beta has a relatively short list of known issues (taken directly from the VMTN post) and the ones listed are reserved for Linux guests:
- You cannot upgrade an existing installation of Converter Standalone to Converter Standalone 5.1 Beta. Before you install Converter Standalone 5.1 Beta, uninstall any earlier versions of Converter Standalone and delete any remaining Converter Standalone server database files from your system.
- You cannot convert physical SLES 9 sources, if the root directory is located on an LVM disk. You need to convert the LVM disk to a basic disk.
- Virtual machines cloned from RHEL6 and SLES 11 sources have no network connectivity. After the conversion is complete, you need to reconfigure the network settings on the destination virtual machine manually.
- Virtual machines cloned from SLES 11 SP1 sources boot in console mode. After the conversion is complete, you need to recreate the xorg.conf file.
Download it now at VMTN: http://communities.vmware.com/community/vmtn/beta/converter_standalone51
This is the second part of a multi-part series about 3PAR from an EVA administrators perspective. See Understanding the 3PAR difference in array architecture for the first part of the series.
One of the most daunting thing about moving from EVA to 3PAR is the change in terminology. While the concepts of many things are the same between the two architectures, what they’re actually called is a completely different matter. So the best place to start is with the brain.
Controller versus Node
EVA have two controllers, regardless of which model. Each controller has its own connectivity, however only one controller at a time can be in charge of any individual Vdisk.
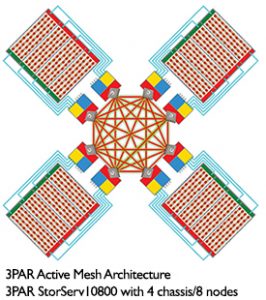
With the 3PAR, a StorServ 7400 or 10000 series can scale up from an initial 2 nodes to 4 or 8 respectively. Each node installs in pairs. Each node is equipped with dual Intel Xeon Processors. And each one of the nodes has full control over the storage which sits behind it, increasing throughput and scalability far beyond what EVA can handle. The nodes are configured in an Active Mesh architecture where each node is cross connected with each other in a fully redundant way.
Disk Groups versus CPG’s
Disk Groups are a physical grouping of disks used for creating Vdisks. Common Provisioning Groups (CPGs) are a bit more than just a group of physical disks. CPGs are a group of properties of how virtual volumes (VV) are created and where the EVA disk groups are a physical divider, CPGs can share all or a part of the same physical disks.
CPGs include properties like the RAID type, the device RPM, the device type and domain. All these properties go towards defining a class of storage for a particular use. The CPGs are reusable profiles that can be chosen when carving out VV’s.
Presentation versus Exporting
EVA has Vdisks and 3PAR has Virtual Volumes. Its basically the same, its a section of storage carved out of a EVA disk group or 3PAR common provisioning group (CPG), respectively. On the EVA, you present your Vdisk to hosts. On the 3PAR, its a slightly difference process. You take Virtual Volumes (VV) and you export them to hosts. Each export becomes a VLUN, which is a single path from host to virtual volume. Its a small but important difference, in that it gives you an additional level of control needed due to the possibility of many ports to present from. The 3PAR is slightly more intelligent – it senses which paths are zoned or exposed to the host and where it is visible. With the EVA, you use all available paths, but with a 3PAR and the possibility of up to 72 PCI slots in a fully populated StorServ 10800, presenting from all simply doesn’t make sense. In addition, a single 3PAR can be used for both Fiber Channel, Fiber Channel over Ethernet or iSCSI all from the same box. But, the process is roughly the same – you match a Vdisk or VV to a host and you export.
EVAPerf versus System Reporter
In all honesty, comparing System Reporter to EVAPerf does it a great disservice. EVAPerf, while adequate, never quite gave administrators enough information and certainly never equipped them with tools to do historical analysis of performance. System Reporter for 3PAR is a much more capable set of performance analysis software. While you can see real-time performance through the Management Console, System Report collects data into a separate database and allows administrators to configure and create reports, even scheduling them to run automatically and email. System Reporter is a lightweight web application that runs separately from the 3PAR arrays and storage processors. It sits to the side and quietly collects metrics for consumption after the fact. System Reporter offers views into the performance of physical disks, virtual volumes, host ports and remote copy ports among other things. Administrators looking for real-time analysis should look to the Management Console.
Chunklets
I just have to mention chunklets. First, the name just makes me laugh a little when I hear it. It sounds like something that happens after a night of too much partying. But chunklets are really the basis of data within the 3PAR arrays. All data is ultimately split into chunklets and spread across the disks of the array. While the EVA did a similiar thing by spreading bits of the data across disks in the disk group, chunklets are not bound to a grouping and can move across any of the disks in the array as long as the CPG they belong to allows it. (CPGs can limit operations to a specific group of disks, if you wanted or needed). Chunklets are also the basis at which analysis and autonomic optimization occurs. When Autonomic Optimization is licensed and enabled on an array, each chunklet is analyzed in order to know whether it should be promoted or demoted to a different class of drives in the array – SSD, SAS or near line.
Comparible Terminology
| EVA P6000 | HP 3PAR StoreServ |
| Controller | Node |
| P6000 Command View | HP 3PAR Management Console (MC) |
| SSSU | HP 3PAR CLI |
| XCS | HP 3PAR Operating System (previously HP 3PAR InForm OS) |
| PSEG | Chunklet |
| Vdisk | Virtual Volume (VV) |
| Disk shelf | Drive chassis |
| Vraid | RAID |
| Thin provisioned | Thin Provisioned Virtual Volume (TPVV) |
| Vdisk presented to a host | VV exported to a host |
| Disk Group | Common Provisioning Group (CPG) |
| Business Copy | Virtual Copy |
| Continuous Access | Remote Copy |
| Host Operating System Type | Host Persona |
| EVAPerf | System Reporter |
| Online Disk Migration, Leveling | Dynamic Optimization (DO) |
| Initialize the system | Execute Out-of-the-Box (OOTB) procedure |
Source: An Introduction to HP 3PAR StoreServ for the EVA Administrator
In part 3, we will dive deep into the 3PAR StoreServ 7200 & 7400’s Peer Persistence technology for metro clustering.
I have been working on this post for well over a year, but it never made it out of my drafts because I didn’t feel comfortable with 3PAR. That all changed this year with the purchase and implementation of two 3PAR StoreServ 7000 series arrays. As an HP EVA customer, 3PAR has always been a compelling alternative, even before HP’s acquisition. The technology looked like close cousins to me. With HP’s introduction of the 7000 series at the end of 2012, it became even more clear this would be our future storage platform and I suspect the future platform for many EVA customers. This post is the first in a multi-part series about 3PAR from an EVA administrator’s point of view.
Close cousins, but different in important ways
Bottlenecks and single-points-of-failure seem to be the two things I combat most as a systems administrator. As a systems admin, you try and identify these points and plan for redundancy and capacity. We have to serve as the realists and the ‘doom-and-gloom’ guys because we plan for the worst case. When applying that concept to storage, it meant that we must purchase an array for our peak performance periods and we would need to often purchase more arrays to combat the problem of at most two controllers in an modular array.
But, newer arrays have come to market with much different architectures which directly combat the bottleneck problems we have traditionally observed in modular arrays. We have seen industry standard servers employed at storage controllers over a cluster of systems to create arrays (like HP’s Lefthand or VMware VSA solutions) and we have seen scale up architecures like the 3PAR StoreServ arrays which have an active-active mesh of up to 8 controllers to increase the performance.
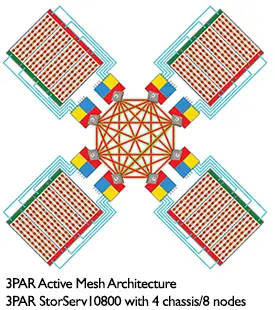 The active mesh architecture is the first big difference between our EVA’s and a 3PAR StoreServ. In an EVA, only a single controller may truly access and control a LUN at any given time. Any requests received through the other controller are simply proxied over and handled by the controlling controller. In the 3PAR, all controller nodes access and own the LUN and can service requests to it. All of this activity is sent across a passive, full-mesh backplane which connects the controller nodes to each other and to the storage shelves. The nodes are connected across high-speed links (800 Mbps in each direction), but also have a low-speed RS-232 serial link for redundancy for control information between nodes in case the main links fail.
The second difference in architecture is related to scale and modularity. When you purchase an EVA, you get two controllers and that’s all it’ll ever have. With a 3PAR array, you can start with two controllers and scale up to a total of 8 controller nodes as your needs increase, depending on the line. The 3PAR StoreServ 7200 is limited to 2 controllers and the 7400 can scale from 2 to 4 controllers, while the 10000 series continues to scale to 8 controller nodes. This is a particular advantage when looking at cloud architecture which has increased the overall utilization of controllers and taxed them to the point of bottleneck on my arrays. HP has touted the P10000 3PAR method of modular controllers as the answer to cloud scale issues. While administrators must still size arrays to the peak, there is some ability to purchase what is needed and then scale up the controllers for the future, where its not possible today in the EVA line.
3PAR StoreServ can also address several storage tiers with different types of storage, mixing and matching volumes across types of storage as needed. While it was also possible to create multiple disk groups in EVA — one with traditional Fiber Channel drives and one with solid state drives, for instance — the EVA does not allow for mixing and matching data across multiple disk groups. With the 3PAR, however, autonomic storage tiering is a software feature of the array that allows chucklets of data to be spread across types of disk. The array can auto-magically determine where things should optimally be stored based on how often and how quickly they need to be access and move them from SATA to SAS to solid-state disks accordingly. This all occurs without an administrator having to actively manage it.
Thin provisioning is the probably the biggest difference between the arrays — not from a pure capability comparison but from how its employed in the array. Since the 3PAR aquisition, HP has brought thin to the EVA line, so from a check box perspective, they both have it.
 But 3PAR utilizes thin throughout its architecture. Thin is fully baked in the the 3PAR ASIC (or application specific integrated circuit) and so it is available at the lowest levels of the array. The array allows for fat to thin conversions of data non-disruptively through its proprietary algorithm. Replication is also handled using the thin-built-in technology through zero detection. Zero Detect, as the HP folks brand it, is a technology which detects and strips zeros from streams of data which makes it possible to no only encode data in a thin fashion on write, but also take data at rest and convert it to thin provisioned data in a timely manner.
Since the HP acquisition of 3PAR, they have worked to make data more portable between storage platforms. Peer Motion was introduced during VMworld 2011 and it is federation technology and allows for zero-downtime relocation of storage from one array to another. Peer Motion is more in line with Storage VMotion in vSphere than a replication technology. The majority of the work is handled on the destination system which is receiving the storage volume. HP has introduced Online Migration, a one way migration from EVA to 3PAR StoreServ. For EVA shops, this is an important technology – since it will allow for non-disruptive moves of data from your EVA to a 3PAR array. The migration is configured through CommandView and at a basic level, involves the 3PAR fronting the EVA’s LUNs to the host and then transparently migrating the data behind the scenes until its all moved to the 3PAR and then removes the link to the EVA. Peer Motion is a major enabling technology for companies looking to migrate data in an automated way.
Stay tuned for part 2, launching next week, where we go deeper on 3PAR terminology for the EVA administrator.
vSphere 4.1 to 5.1 lessons learned
For the last two years, I’ve been behind the curve with VMware vSphere. My deployment has continued to run at vSphere 4.1 while the rest of the world ticked along with 5.0 and 5.1. We were stuck because we relied on VMware’s Update Manager product to handle guest OS patching in our environment and we needed to find and implement a replacement for this product.
After many months of evaluations, we ultimately decided up on VMware’s vCenter Protect product for patch management and upon implementing it earlier this year, we were finally free to upgrade to the latest and greatest vSphere.
At the same time, my last official VMware training class was with version 3.5 — and that class was only an update class. A lot has changed. I read blogs online and also buy books to try and keep up, but its hard to get well versed with you aren’t hand-on. So, there were a number of things in this upgrade that I learned – some through reading – some through experience.
What I Learned
The jump from 4.1 to 5.1 is not a trivial one. We ran good ‘ole ESX in our 4.1 environment and so the move to 5.1 meant the disappearance of the service console. Fortunately, we did not use any specific agents or plug-ins inside of ESX, but we were quite used to the service console for troubleshooting.
Lesson 1: Get familiar with PowerCLI and ESX-CLI before moving from ESX to ESXi.
Troubleshooting and configuration is all handled remotely now from either PowerCLI, ESX-CLI or from the vSphere Management Appliance. It is imperative that you get familiar with these tools before the move. The great news is that you can use any of these tools against ESX installs the same as ESXi installs. I spent about 6 months with PowerCLI getting very familiar with it and spending some time on ESX-CLI before our transition. It was time VERY well spent.
Another major change with ESXi is the footprint of the actual hypervisor installation. Frankly, its small. There is really no need to have local spinning disks for accommodate the hypervisor installation and many of my peers have chosen to go with local USB Flash or SD storage instead. Several years ago, when VMware first announced ESXi, this was one of their big features touted for the version – a smaller footprint and the ability to install it on USB Flash storage. It holds true today, although I found that the ESXi 5.1 installer does not create a location for logs and persistent host data on the USB or SD.
Lesson 2: If you install ESXi to USB or SD, you also need to setup a place to store logs and crash dumps on shared storage elsewhere.
Quickly after installing ESXi for the first time on USB, my hosts alerted me that I needed to establish a shared storage location for logs and crash dumps. A bit of searching on the VMware Knowledge Base, I found the following:
Due to the I/O sensitivity of USB and SD devices, the installer does not create a scratch partition on these devices. As such, there is no tangible benefit to using large USB/SD devices as ESXi uses only the first 1GB. When installing on USB or SD devices, the installer attempts to allocate a scratch region on an available local disk or datastore. If no local disk or datastore is found, /scratch is placed on the ramdisk. You should reconfigure /scratch to use a persistent datastore following the installation.
Basically, you need a VMFS datastore on which to save your persistent host data and a single datastore can work for all hosts in a cluster. Once the USB or SD card is used for boot, it does very few write operations back to the disk – instead choosing a medium more suited to handling log data.
Each hardware vendor seems to create a customized distribution of ESXi that is available directly from VMware – whether you have Dell, HP or IBM hardware. The custom image includes agents and drivers baked into the distribution for your specific hardware.
Lesson 3: Its worth using the vendor specific ESXi distribution because it helps light up CIM information in vCenter.
vCenter does a good job of keeping alarms and alerts front and center for the administrator. With the OEM specific ESXi distributions or by adding the OEM specific packages to a standard ESXi installation, you will enable CIM agents to report on hardware issues and environmental conditions through a familiar interface.
On the topic of familiar interface, vSphere 5.1 marks the first version with the vSphere Web Client. The Web Client is the destination for all the latest features and functionality including enabling version 9 virtual hardware, shared-nothing storage vMotion, and version 5.1 Distributed Virtual Switches among other features.
Lesson 4: If its a new feature to 5.1, look for it in the Web Client. And get to know the vSphere Web Client – it is the future.
VMware, as a company, has been very straight forward when it makes decisions – like eliminating ESX in favor of ESXi. It gives its customers the information and then slowly weens them away from the old way towards its new direction. The vSphere Web Client is the next in the list of these. It is obvious that VMware is seeking to unify its client away from different interfaces and functionality towards a unified web portal for all its products and management. The vSphere Web Client today already has the core vCenter and vCenter Orchestrator functionality packaged into the web client. Unfortunately, administrators will have to run both the Win32 and Web Client to get the total picture. VMware Update Manager only exists in the Win32 client today – so patching and upgrading your hosts and VMware Tools will need to be done there. As of VMworld last August, VMware committed to moving the Update Manager functionality into the Web Client soon. Search in the vSphere Web Client seems particularly powerful for locating both VM objects, infrastructure objects and settings.
There was a time when vCenter did all the heavy lifting for a vSphere deployment. Increasingly, there are a number of additional solutions that most shops need to deploy along with vCenter. One of the additions for 5.1 is the vSphere SSO Server – used for centralized authentication. The SSO Server opens a number of new possibilities as the eco-system continues to grow. It is a necessary part of the 5.1 deployment and should not be ignore; frankly, it cannot be ignored. It is required. As the eco-system continues to grow, interoperability becomes a bigger concern for administrators.
Lesson 5: Use the VMware Product Interoperability Matrix. Check your database interoperability Check version interoperability of all your other VMware ecosystem components.
Whether you’re using vCenter Server Heartbeat, vCenter Operations, Update Manager, Converter or any other component, the interoperability matrix will give you the information you need to ensure your components work together. In general, vCenter Server 5.1 and ESXi 5.1 will require all the other components to be at version 5.1, but there are some components like vCenter Server Heartbeat that follow a different version numbering, so that matrix is a great resource to ensure you’re where you need to be.
Additional Links for 4.1 to 5.1 upgrade
- Installing or upgrading to ESXi 5.1 best practices (2032756) – VMware Knowledge Base
- Booting ESXi off USB/SD – Kyle Gleed, VMware vSphere Blog (Great advice for those considering USB/SD boot for ESXi)
- Installing ESXi 5.x on a supported USB flash drive or SD flash card (2004784) – VMware Knowledge Base
- Upgrading to vCenter Server 5.1 best practices (2021193) – VMware Knowledge Base
- vCenter 5.1 Upgrade Planned? Verify SSL Certificate Checking – Chris Wahl, WahlNetwork.com
In their latest wave of survey findings, Solarwinds poses the Systems Administrator versus the Network Administrator – SysMan versus NetMan. The following is an infographic with the findings as they compare the people behind the two job titles.
click to enlarge the graphic
The full press release is below:
SolarWinds Survey Reveals IT Pros are Engaged, Upbeat and Loyal Employees
Study of US-based Systems and Network Administrators Uncovers Overarching Similarities as well as Pointed Differences on the Job
AUSTIN, TX – January 9, 2013 – SolarWinds (NYSE: SWI), a leading provider of powerful and affordable IT management software, today released results of a survey of network administrators, the second part of a comprehensive survey which last month announced findings for systems administrators. The results show a striking similarity between both groups in job satisfaction and optimism, experience and loyalty, as well as how they like to spend their free time and even their favorite video games and geek TV shows. The survey also uncovered several key on-the-job differences between the groups, related to their job functions and responsibilities, views towards the organizations they work for and compensation levels.
These results are part of a wide-ranging survey of 401 U.S.-based systems administrators, or sysadmins, and 400 U.S.-based network administrators, or netadmins, conducted in October 2012 to understand the IT professional in both their professional and personal lives. Despite 90 percent of each group agreeing there are now more responsibilities and demands on their time, the overarching results find IT workers to be model employees: experienced, optimistic and confident in their companies, loyal and satisfied in their job roles.
On the job, the survey revealed sysadmins and netadmins felt similarly about the following factors, even though there were some key differences between groups:
- High levels of overall job enjoyment: Though both groups enjoy their jobs, netadmins demonstrate slightly higher job satisfaction. More netadmins (79 percent) expressed enjoyment in their jobs compared with sysadmins (68 percent). Similarly, more netadmins (66 percent) felt appreciated by the organization, higher than theirsysadmin counterparts (56 percent). The most enjoyable thing about their jobs? Two-thirds of netadmins and sysadmins agree it’s solving problems, the top answer for both groups.
- New Year’s projections: System and network admins overall believe their 2013 budgets will likely remain flat. Thirty-eight percent of these IT pros expect no change from 2012; the overall prediction for netadmins is a 1.5 percent growth in budget, versus an expected 1 percent decline for sysadmins. Nonetheless, both groups remain optimistic for the New Year: 83 percent of netadmins and 73 percent of sysadmins agree 2013 will be a better year for their companies.
- Loyalty towards and confidence in their companies: Both netadmins and sysadmins are loyal to their companies, with 52 percent of netadmins and 48 percent of sysadmins having worked at their jobs for 10 years or more or never having changed jobs. Eighty-five percent of netadmins expressed that they have some level of trust in the senior/executive leadership of the company, compared with 77 percent of sysadmins. The numbers were even higher for trust in IT leadership, with 92 percent of netadmins and 82 percent of sysadmins expressing some level of trust.
- Feeling supported: A key shared viewpoint among both groups is that they feel supported and empowered to do their jobs in various ways. A majority of both groups feel they have adequate tools and software, support from the organization and ongoing training and skills development. Netadmins, however, receive slightly more support, with 75 percent versus 63 percent of sysadmins saying they have adequate tools and software; 72 percent versus 57 percent having adequate organizational support; and 66 versus 58 percent having adequate ongoing skills training and development. But universally, most IT pros – 70 percent of both groups – feel their work is not well understood by others in the company.
Despite overall similarities in their overarching positivity towards the job, there are several key differences between netadmins and sysadmins:
- Responsibility and compensation: As may be expected, netadmins have a wider range of responsibilities compared with theirsysadmin counterparts. As a result, netadmins also spend more free time working, with 52 percent indicating they spend a “significant” amount of time completing tasks, compared with 43 percent ofsysadmins. Perhaps this accounts for the gap in pay, with netadmins making an average of $87,000 per year compared to $78,000 on average for sysadmins.
- Split frustrations: While the top frustrations for sysadmins was too little pay followed by increasing workloads, the top frustration for netadmins was not having enough budget followed by too little pay.
- Ambitions: In five years, 43 percent of netadmins see themselves as IT department head and 17 percent see themselves as CIO. Similarly, 39 percent of sysadmins see themselves as IT department head, but a much smaller group – only five percent – see themselves as CIO. Interestingly, there is some desire between the groups to switch job roles: 19 percent of netadmins say they will cross over to systems management, while 23 percent of sysadminssay they will be netadmins in five years.
“Our survey reveals that IT pros are a remarkable and resilient bunch,” said Kevin Thompson, President and CEO, SolarWinds. “They are unsung heroes in many companies, but they are incredibly loyal and motivated despite the scope of work they do and the demand of work on their time both on and off the job. It’s essential for companies to understand what drives netadmins andsysadmins to perform and give them the support that helps make their jobs easier in order to retain these valuable employees.”
As with their professional lives, network administrators and systems administrators show some remarkable similarities in their personal lives and preferences.
- Personality traits: More than 60 percent of both groups say they are hardworking, the top personality trait chosen, followed by more than 50 percent of both groups indicating they are friendly.
- Gadgets of choice: Netadmins were split in their preference over Android and iPhone, with 37 percent of respondents in each category. This compares with a slight majority of sysadmins using Android phones over iPhones. As with sysadmins, an overwhelming majority of netadmins, 82 percent, are PC users.
- What they watch: The top sci-fi TV show for both groups was “Star Trek,” followed by “The Big Bang Theory” and “The X-Files.” But on the big screen, like their sysadmin colleagues, netadmins prefer light sabers over phasers as “Star Wars” narrowly beat out “Star Trek” for top sci-fi movie honors.
- What they drink: If they aren’t working during their free time, netadmins and sysadmins can enjoy a brew together after work. Forty percent of netadmins and 31 percent of sysadmins prefer some kind of beer to drink in their off time. More sysadmins drink soda, though, with 19 percent of sysadmins versus 10 percent of netadmins preferring some pop when off duty.
- More similarities: Both groups list Batman as their favorite superhero; rock music as the genre of choice; and compact cars as current vehicles. The top three answers for what they like to do in their free time were the same between the two groups: 1) spending time with family and friends; 2) unwinding at home; and 3) surfing the web.
Demographically, two-thirds of both groups were male. Slightly more netadmins than sysadmins have advanced degrees, with 77 percent of netadmins having at least a bachelor’s degree compared with 65 percent ofsysadmins. Netadmins were also a bit more experienced, with 68 percent indicating more than 8 years of experience versus 62 percent of sysadmins.
The complete survey results can be found on SlideShare, and an infographic on the data can be found on SolarWinds’ Whiteboard blog.
About SolarWinds
SolarWinds (NYSE: SWI) provides powerful and affordable IT management software to customers worldwide from Fortune 500 enterprises to small businesses. In all of our market areas, our approach is consistent. We focus exclusively on IT Pros and strive to eliminate the complexity that they have been forced to accept from traditional enterprise software vendors. SolarWinds delivers on this commitment with unexpected simplicity through products that are easy to find, buy, use and maintain while providing the power to address any IT management problem on any scale. Our solutions are rooted in our deep connection to our user base, which interacts in our online community, thwack, to solve problems, share technology and best practices, and directly participate in our product development process. Learn more today at http://www.solarwinds.com/.
 Automation has been a huge part of my recent learning curve. I’ve spend a considerable amount of time working with tools to decrease my manual administration time within our VMware environment. One tool is vCenter Orchestrator and the other is trusty old PowerCLI.
In the process, I’ve found myself increasingly spending more time with PowerCLI to do my daily job. PowerCLI has really changed how I administer and maintain my VMware farms and how I script and easily address issues in the environments. For any repeated task, there is usually a quick one or two line PowerCLI command to handle it. The following are a list of my handy scripts and one-liners for storage issues. I hope you find them useful.
Bulk Storage vMotions
You can certainly do storage vMotions in the GUI – but its so much more fun from the command line and more efficient in my opinion. Say you’re moving everything from one LUN to another for maintenance or migration – script it, like below:
[sourcecode language=”powershell”]Get-VM -Datastore <SourceDatastore1> | Move-VM -Datastore <TargetDatastore> -runasync[/sourcecode]
It is way to easy to move all of your VMs in one line than manually move them one by one. Maintain your sanity with this one-liner!
Find RDMs in your environment
This process will find any RDMs in your environment. I’ve found it useful as we attempt to phase out use of RDMs.
[sourcecode language=”powershell”]Get-VM | Get-HardDisk -DiskType "RawPhysical","RawVirtual" | Select Parent,Name,ScsiCanonicalName,DiskType[/sourcecode]
Cleanup Backup Snapshots
A common problem in our environment are “Consolidate” snapshots that our backup process leaves behind. Find and irradicate those with this quick command:
[sourcecode language=”powershell”]Get-VM | Sort Name | Get-Snapshot | Where { $_.Name.Contains(“Consolidate”) } | Remove-Snapshot[/sourcecode]
Find Lost or Unknown Snapshots
Our backup process also seems to leave behind orphaned snapshots, snapshots vCenter or ESX no longer knows about. vCenter sees the VM in linked-clone mode, where the VMX file points to a snapshot VMDK instead of the original parent.
VMs in linked clone mode prevents storage vMotion, so they can be very problematic. The following one-liner compares a list of known VMware snapshots with a list of all VMs with VMDK files pointing to snapshot VMDKs. The resulting list is a list of target VMs to be cleaned up.
[sourcecode language=”powershell”]Compare-Object $(Get-VM | SORT | Get-Harddisk | WHERE { $_.Filename -like "*0000*" } | SELECT @{Name="VM";Expression={$_.Parent}} | Get-Unique -asstring) $(Get-VM | Get-Snapshot | SELECT VM | Get-Unique -asstring) -Property VM[/sourcecode]
Repair Lost or Unknown Snapshots
Knowing is only half the battle. While technically not a one-liner, the following routine will take the list you created with the one-liner above and merge those linked clones back together. Trolling the VMware Communities forums, I found that if you create a new snapshot and then remove all snapshots on VMs in this unknown snapshot mode, VMware rediscovers the ‘lost’ snapshot and will indeed remove them. That’s the gist of what this routine does:
[sourcecode language=”powershell”]$TARGETS = Compare-Object $(Get-VM | SORT | Get-Harddisk | WHERE { $_.Filename -like "*0000*" } | SELECT @{Name="VM";Expression={$_.Parent}} | Get-Unique -asstring) $(Get-VM | Get-Snapshot | SELECT VM | Get-Unique -asstring) -Property VM
FOREACH ($TARGET in $TARGETS) {
new-snapshot -Name "SnapCleanup" -VM $TARGET.VM
}
FOREACH ($TARGET in $TARGETS) {
write $TARGET.VM.Name
get-snapshot -VM $TARGET.VM | remove-snapshot -Confirm:$false
}[/sourcecode]
Wallpaper
For anyone looking for wallpaper for their office or cube, I’d suggest a PowerCLI Cmdlet Poster – version 4.1 here or version 5.1 here. I have one in my cube and I find it handy for a quick reference for cmdlets.

