
When HP introduced the ProLiant DL580 Gen8 last February, HP also launched it’s new UEFI firmware, which replaced traditional BIOS and became the standard across all ProLiant Gen9 servers introduced last September. Typically, the powerhouse ProLiant DL580 servers lag behind the introduction of other generational servers and the Gen8 model was no different, being introduced well over a year after Gen8 debuted. Its pretty safe to assume that HP sells many less units of the DL580 model than other ProLiant rackmounts and it was a pretty smart strategic move to add UEFI to this model before launching it across the entire line of mass-market servers.
Some of the menus in the UEFI inteface on the ProLiant DL580 Gen8 are a little clunky. One of those is the boot order screen. After several failed attempts at changing the boot order, I engaged the help of a product manager within HP who explained where I was going wrong. And for the benefit of others, I wanted to put this out to explain how to make boot order changes on the ProLiant DL580 Gen8. The trickiness comes when you actually make the change – getting to the boot options is straight forward.
Fortunately, the same product manager confirmed that ProLiant Gen9 servers have an improved version with clearer instructions.
Changing Boot Order on a DL580 Gen8 with UEFI
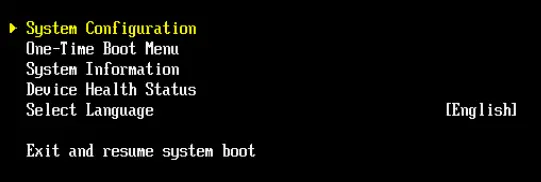
During the normal boot sequence, you get the normal POST screens and options along the bottom – one of those is F9 for System Utilities and you should press F9 to invoke those menus.
![]()
Once the System Utilities menu appears, choose the System Configuration option and press enter.
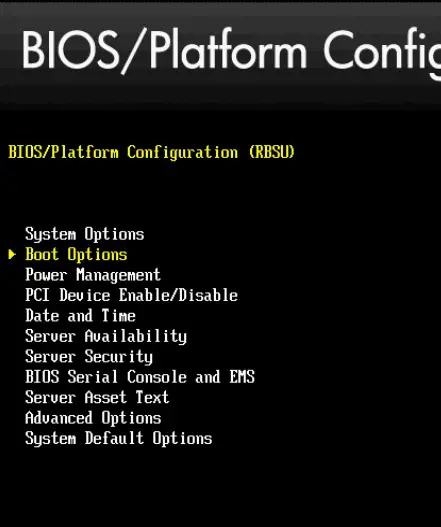
From System Configuration, you will choose Boot Options and press enter.
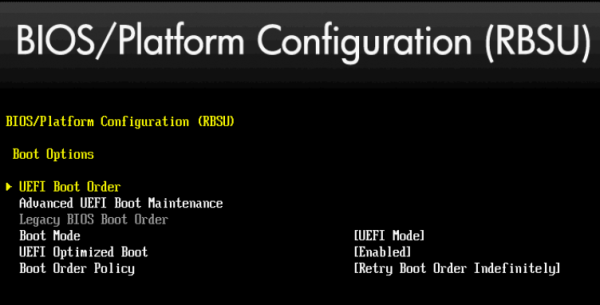
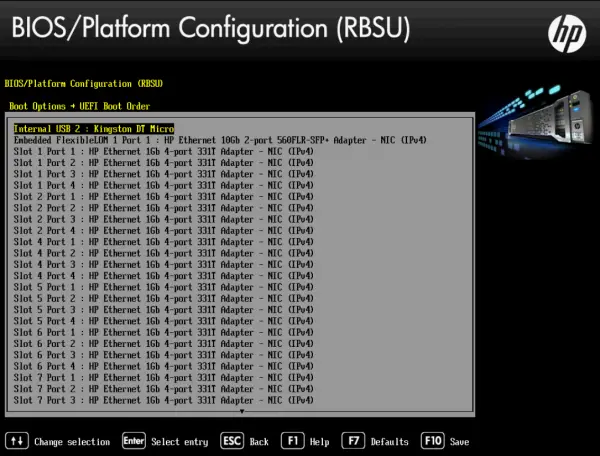
From the Boot Options, you come to the RBSU and the first option is the UEFI Boot Order. Choose UEFI Boot Order and press enter.
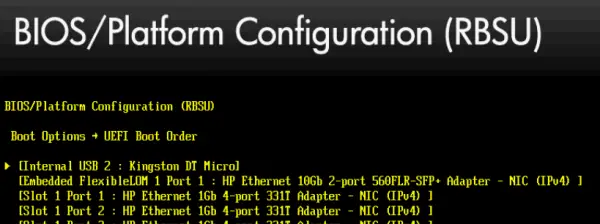
This screen also confirms whether you are using UEFI Mode or Legacy BIOS for booting. If you wanted to make a change, this is the screen where you change to Legacy BIOS from UEFI or vice versus. If you make a boot mode change, all options will get greyed out and you will need to reboot and go back into System Utilities to make further changes.
Once you’re in the UEFI Boot Order screen, you see a list of options along with brief instructions.
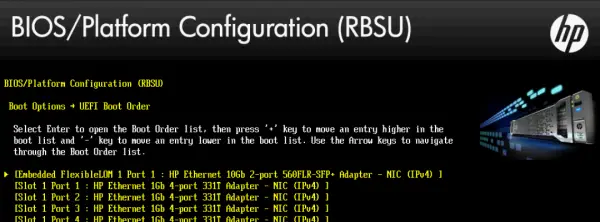
You must press enter to go into the boot order screen and make changes. Scroll to the item you want to move in boot order and press the + or – keys to move the item up or down the list.
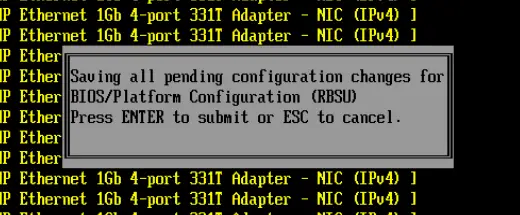
Once you make the changes, press Enter to save those changes. There is no onscreen prompt that says this, but pressing F10, even though it says Save in the display, will not save it. Pressing ESC will lose your changes.
Once you press Enter, you go back to a screen and should see your new boot order confirmed. You may press F10 here to save the settings. Press Enter as instructed on the on-screen prompt and this saves the changes.
When the system reboots, now you should immediately begin booting from your USB device or hard drive that you moved to the first position in boot order.
