I found my self needing to generate diagnostic information for vCenter Server 4.0 U1. I have done this in the past, using the following steps.
“
-
Log in to VirtualCenter with the vSphere Client, as an administrator or log in directly to an ESX Server with the root user.
-
Click File > Export > Export System Logs.
-
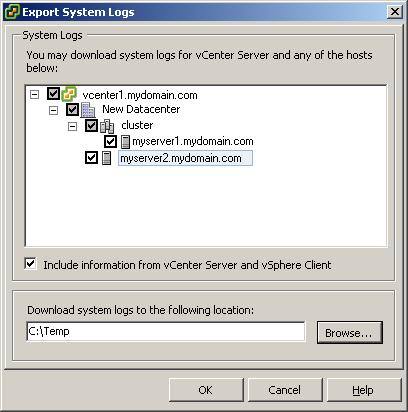
On the Save Export System Logs Window, choose the host(s) to collect diagnostic data from and whether to include data from VMware Virtual Center.
Note: If you are directly connected to an ESX Server skip this step as the Diagnostic Data Component of the Window is not displayed.
Click Browse and specify a location to save the diagnostic data to. The following shows the Export System Logs dialog:
Note: Selecting the Include information from vCenter Server and vSphere Client option includes additional non-ESX related logs.
4. Click OK to start the generation of the logs.
* taken from http://kb.vmware.com/selfservice/microsites/search.do?language=en_US&cmd=displayKC&externalId=653
“
Collecting diagnostic information for VMware vCenter Server 4.0
KB Article: 1011641
Collecting diagnostic information for VMware ESX Server 2.5, 3.0, 3.5 and 4.0
KB Article: 653
“
Obtaining Diagnostic Information from the ESX service console
Diagnostic information can be obtained directly from any version of ESX host. Information cannot be obtained from ESXi hosts in this way.
To collect diagnostic data at the ESX command prompt:
-
Log on to the service console as root.
-
Confirm the version of VMware ESX Server you are running.
-
On ESX Server 2.x and 3.x hosts, determine the base build number with the following command:
[fusion_builder_container hundred_percent="yes" overflow="visible"][fusion_builder_row][fusion_builder_column type="1_1" background_position="left top" background_color="" border_size="" border_color="" border_style="solid" spacing="yes" background_image="" background_repeat="no-repeat" padding="" margin_top="0px" margin_bottom="0px" class="" id="" animation_type="" animation_speed="0.3" animation_direction="left" hide_on_mobile="no" center_content="no" min_height="none"][root@esxhost]# vmware -v
-
On ESX 4.x hosts, determine the system level with the following command:
[root@esxhost]# vmware -l
-
-
Run the following command to change to the directory where you want the output to appear. For example:
[root@esxhost]# cd /tmp
Note: If you run the script in /usr/bin, the output appears in that directory and remains there until you delete it.
Run the following command to execute the script:
[root@esxhost]# /usr/bin/vm-support
You do not need to power off your virtual machines before running this script.
For ESX Server performance issues, VMware Technical Support might ask you to collect performance snapshots using the the -s and -S switches. For more information, see Collecting performance snapshots using vm-support (1967) .
When the script finishes, it generates a file with named
[email protected]’
New directions? OK, let’s try that.
# cd /
# cd /temp
# /usr/bin/vm-support
It worked!
But, why?
Let’s do some investigative work to see what is going on.
First let’s do a df -h to see free space, this also display’s your partitions.
Hmm, / seems really full, I wonder why?
How do I tell what is taking that room?
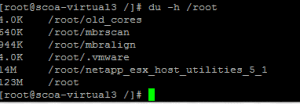
Thanks to Jason Boche via, twitter, I found that du -h would show used files per directory.
See KB 1016511 ESX 4 may generate a purple diagnostics screen or kernel panic after an upgrade due to an insufficient disk space
“If you are unable to determine where the space is being used, you can run the following command:
[root@server]# find / -size +10240000c -exec du -h {} ; | less
This command provides a list of all files that are larger than 10MB in size.
After you have determined what is taking up the free space you can use the rm command to free up space by deleting files.
Warning: When you delete a file there is no way to recover it, so use caution when deleting anything.
The following are a list of files that are safe to delete:
-
Old vm-support logs, usually under /usr/lib/vmware/hostd/docroot/downloads/
-
Virtual machines that are not needed and were copied to service console for storage
-
ISO files that were copied to the system. In many cases under the /vmimages folder
Note: Do not delete the VMware Tools ISO files.”
I had to at a 0 to 10240000c, to narrow down the results. I also found that q exists the command.
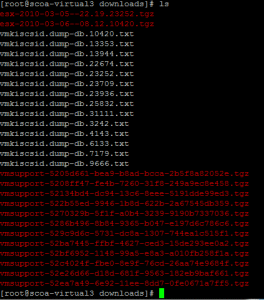
I found I had several large files in /usr/lib/vmware/hostd/docroot/downloads/
I didn’t get a screen of each size, but they totaled over 2 GB.
I then looked to see the correct method to delete these files, as above it says it is save to deleted files in this directory.
I found KB 1008970 After upgrading ESX, esxcfg-boot fails with a More than one VMkernel found error“
Run the following command to delete these directories:
# rm -rf /var/lib/vmware/hostd/docroot/downloads/vm-support-*
or
# rm -rf /usr/lib/vmware/hostd/docroot/downloads/vm-support-*
“
Or, I found that you can use something like WinSCP or Veeam’s FactSCP to browse the directory, and delete the files.
let’s try df -h again.
Much better!
I hope this helps someone else in this situation.
As I was doing this process, I thought to my self that I could be a good idea to create a separate /usr partition, then you wouldn’t have / fill up from support files.
Could it also be a good idea to make /root a separate partition as well? After all, some large files can be stored there.
This lessen also reminds us all to keep a eye on our local disk, even if you do not have a VMFS datastore on it.
Thoughts on the partitioning, or anything else?
Roger L.
[/fusion_builder_column][/fusion_builder_row][/fusion_builder_container]


