This post is the first in a series of creating Tanzu Kubernetes on vSphere 8. I’m doing this my home lab, which I have decided to create with an Orange theme, because its not an Apple lab. (Yes, that’s cringy dad-joke territory.)
So what is done up to this point in the lab?
- Purchased a Ubiquiti Dream Machine Pro as my core switch & router
- Setup several VLANs for vSphere use
- Management VLAN
- vMotion VLAN
- FT VLAN
- Storage VLAN for iSCSI
- VSAN VLAN (for later)
- Servers VLAN for VM workloads
- Purchased 3 x HP Z640 workstations with Xeon processors, RAM and an SSD boot disk
- Setup iSCSI from a Synology NAS
- Added dual 10Gb NICs to each host and added a Ubiquiti 8 port 10Gb Switch
- Used 10Gtek brand TwinAx/DAC 10Gb cables to connect things up
- Installed ESXi 8.0.0 on each host
- Deployed vCenter 8.0.0
- Configured a Standard vSwitch and Distributed vSwitch
- Setup iSCSI software adapters, configured, connected and provisioned 2 x 1TB VMFS datastores
Deploying TKG
Tanzu Kubernetes Grid (TKG) with vSphere 8 has gotten significantly simpler, in my eyes. The wizards in vCenter 8 are great and walking a novice through the deployment of TKG in a simplistic way, however, there are somethings that flow better with the workflow if you’ve completed prep before hand.
Checklist of items to complete before the Workload Management wizard
- vSphere Enterprise Plus licensing is required because DRS (and vSphere Distributed Switch) is required. HA also needs to be enabled.
- You will need to make some basic network decisions around load balancing.
- You will either need to use native vSphere Distributed Switches (VDS) or NSX
- For vSphere Distributed Switches, you need a load balancer. Either deploying NSX Advanced Load Balancer or HAProxy load balancer are you two options.
- For NSX, you’ll use their internal load balancing features of NSX.
- NSX-T is supported and you can use a vSphere Distributed Switch (a converged distributed switch) but not a NSX Distributed Switch/N-DVS). You must migrate if you use N-VDS.
- You need to setup and define vSphere Zones or your Tanzu is limited to a single vSphere cluster. Personally recommend setting up a zone (see below).
- A storage policy is required.
- Management Network – control plane VMs to the Supervisor cluster
- Workload Network – traffic to the Kubernetes API, workloads, and services
vSphere Zones
Most customers are probably not leveraging vSphere Zones. This feature in vSphere is for multiple zone deployments when a customer scales to multiple colocation datacenters or clouds. I would recommend that even as you start your Tanzu journey, even if you only have a single zone – go ahead and create a single zone. This is one step in future-proofing your Tanzu installation. The whole idea of Kubernetes is enabling your cloud-native applications to be deployed across multiple clouds for resiliency. By creating your first zone, you create your first step in this journey. For more detail, see this article.
If you choose not to use vSphere Zones, you’ll need to choose a cluster to assign your Tanzu deployment onto.
New Networks for Tanzu and HAProxy (or NSX)
I created 3 new networks for Tanzu and HAProxy. The first is a Kubernetes Control Plane network. The second is a Load Balancer network. The third is a Kubernetes workload network.
The Kubernetes Control plane will be used for the HAProxy management network. This is where Tanzu will talk to HAProxy to configure and programmatically setup external access to your Kubernetes workloads. “Programatically” is the key here. Kubernetes will reach out to HAProxy and make all the magic happen automatically. While I’m talking about HAProxy – the same is true with NSX Advanced Load Balancer (aka AVI Networks) or NSX-T’s built-in load balancer.
The Load Balancer network is where your external endpoints for your workloads are going to be exposed. It is a range of IP addresses. For your production workloads, this is the network that should scale with the number of workloads you plan to have. Keep in mind, this is for the single zone (back to the previous concept) – so enough external IP addresses
HA Proxy Download and Config
Review the requirements of HAProxy Load Balancer from VMware. You can obtain the current OVA from VMware’s GitHub for HAProxy – https://github.com/haproxytech/vmware-haproxy.
As you deploy, take note of the following things that you will need during the configuration. Network settings and some backend network configuration for the HAProxy configuration is definitely required.
- HAProxy Load Balancer Controller Endpoint – this is the API endpoint that Tanzu will call to configure HAProxy. This is the primary integration point of HAProxy with your Kubernetes and vSphere clusters.
- Username and password configured during the HAProxy deployment
- Virtual IP Address Ranges
- TLS Certificate from the HAProxy appliance
I loaded the HAProxy OVA into my Content Library (aka The Barn) and then cloned a VM out from this location. It is a standard OVA deployment and you’ll be prompted for configuration to deploy. This guide does a great job of walking you through the HAProxy deployment.
Wizard, wizard
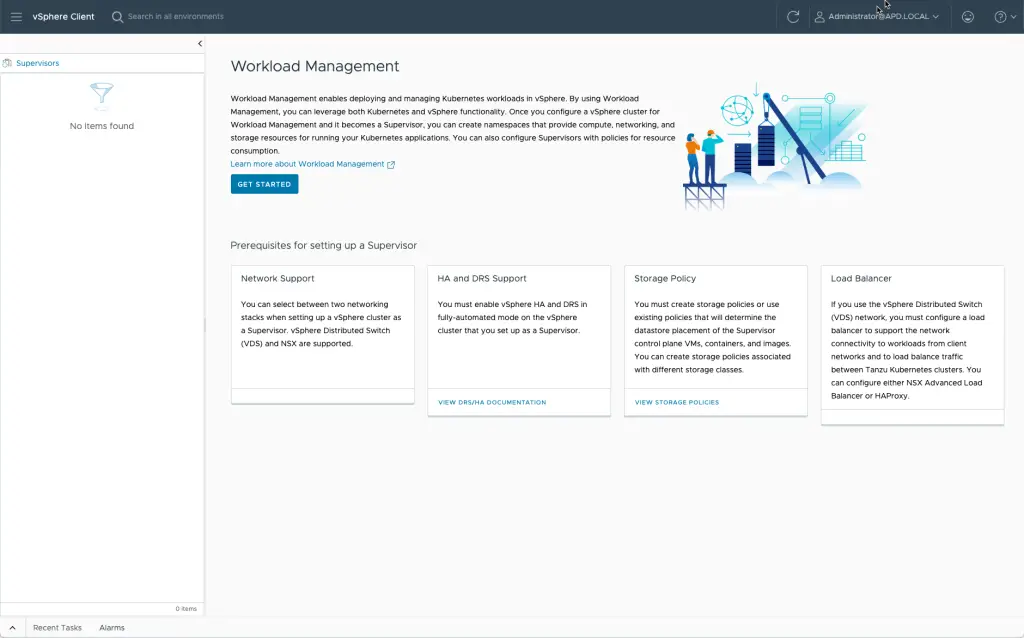
Welcome. The pre-requisites are listed and linked to documentation.
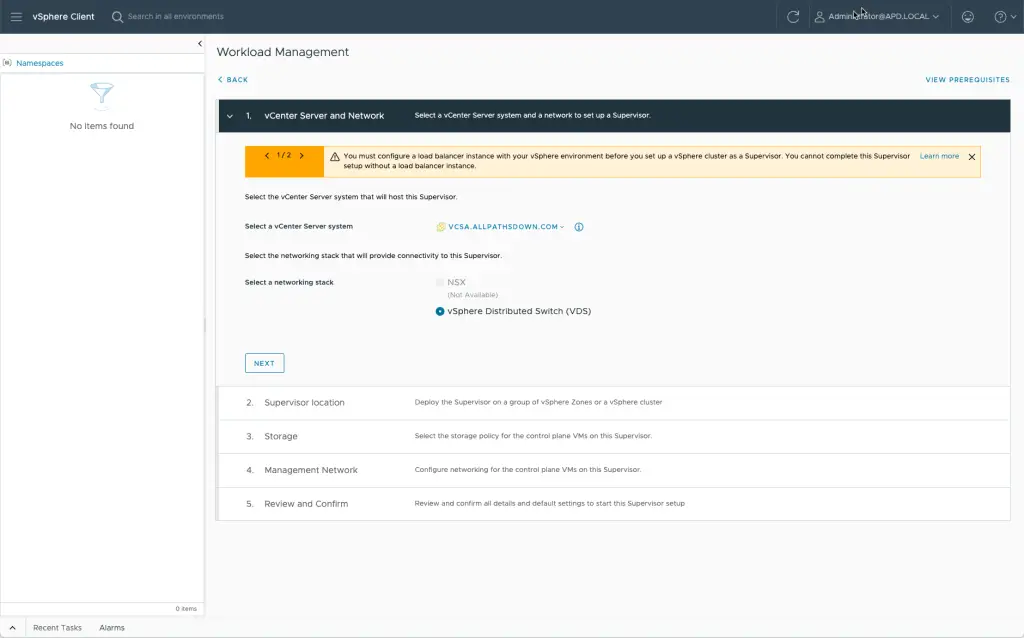
Decisions, decisions – What vCenter Server and what network technology will you use? The wizard adjust based on your choices. For a base level in the lab, I’m deploying VDS.
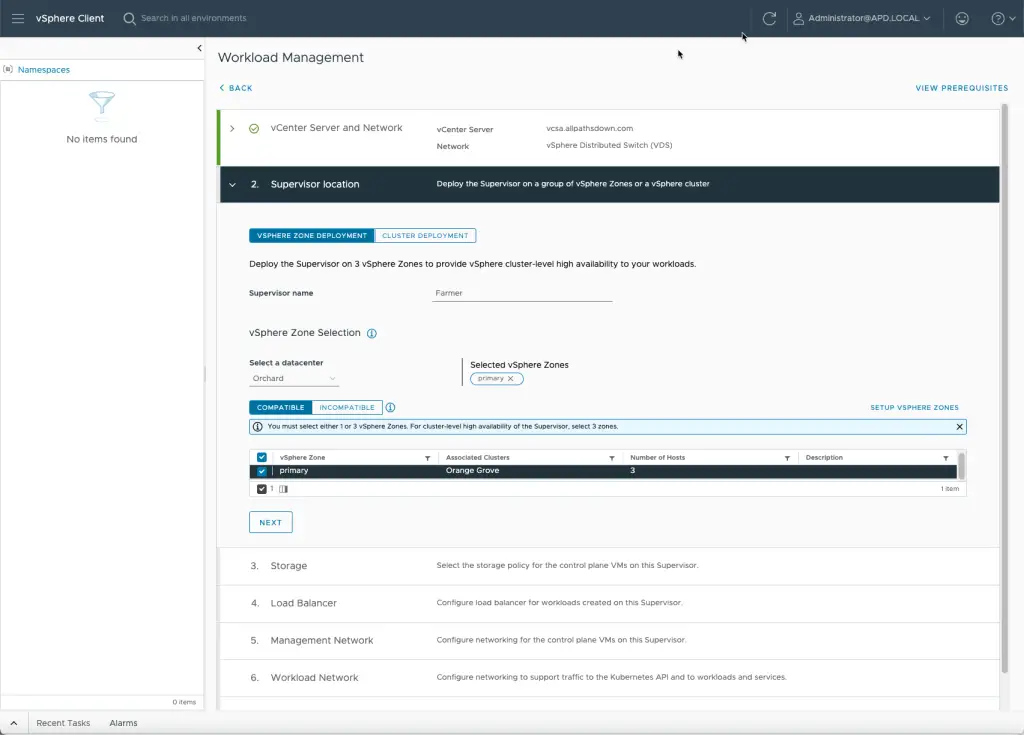
Next step is choosing where to deploy your Supervisor cluster – the Kubernetes cluster that controls all workload Kubernetes clusters in your deployment. This is where you can choose and associate a vSphere Zone to allow for scale and multi-zone resiliency.
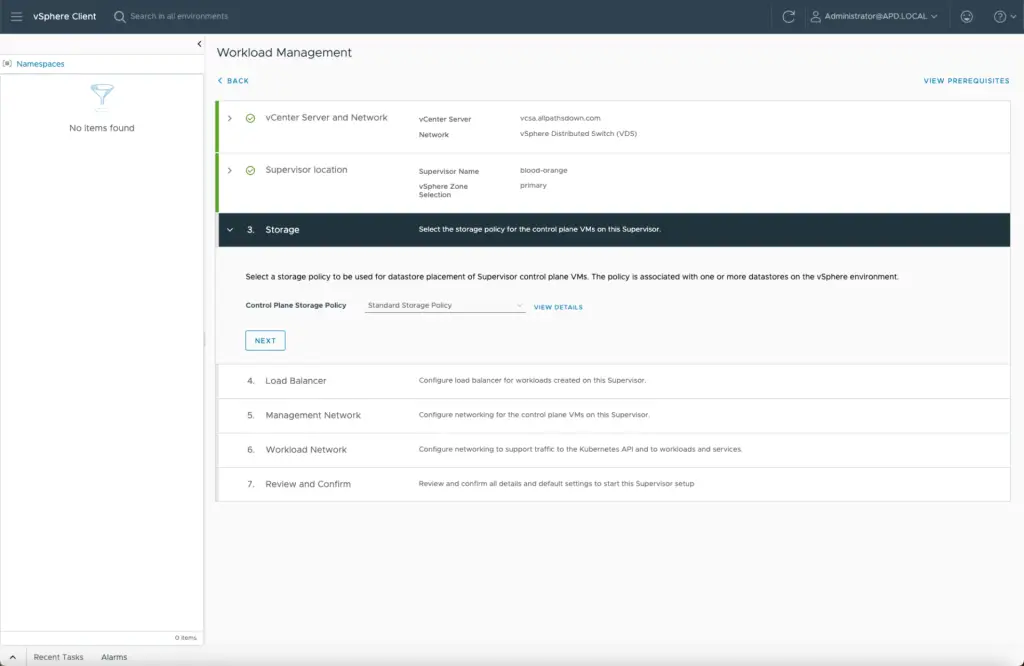
You’ll choose a storage policy – easy peasy.
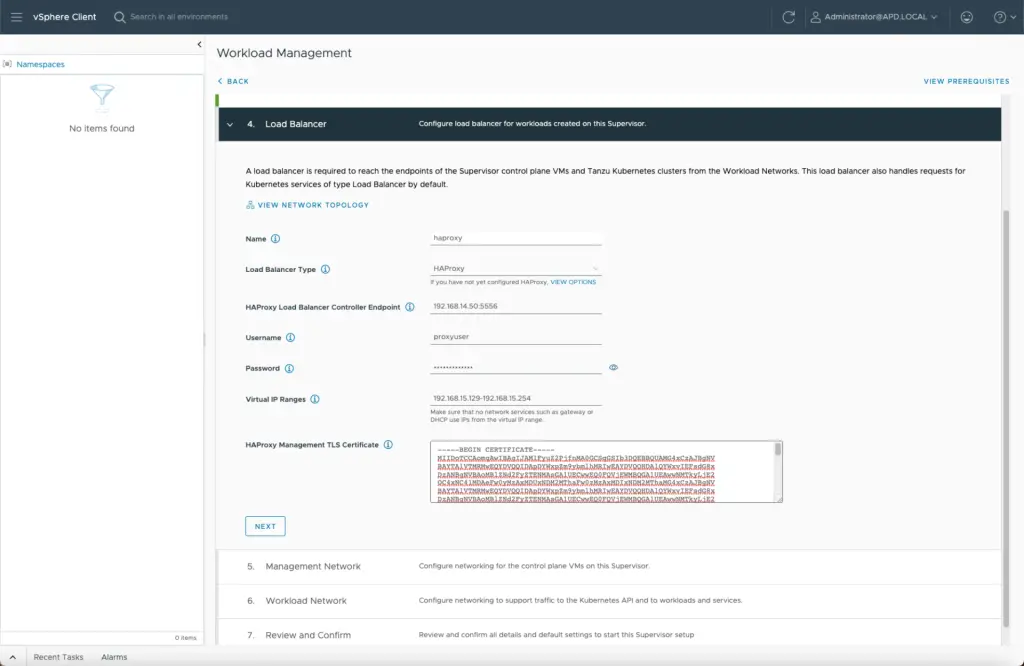
Next, your load balancer configuration – as noted from above for HAProxy, will be required to input and associate the stand-alone HAProxy or HAProxy cluster.
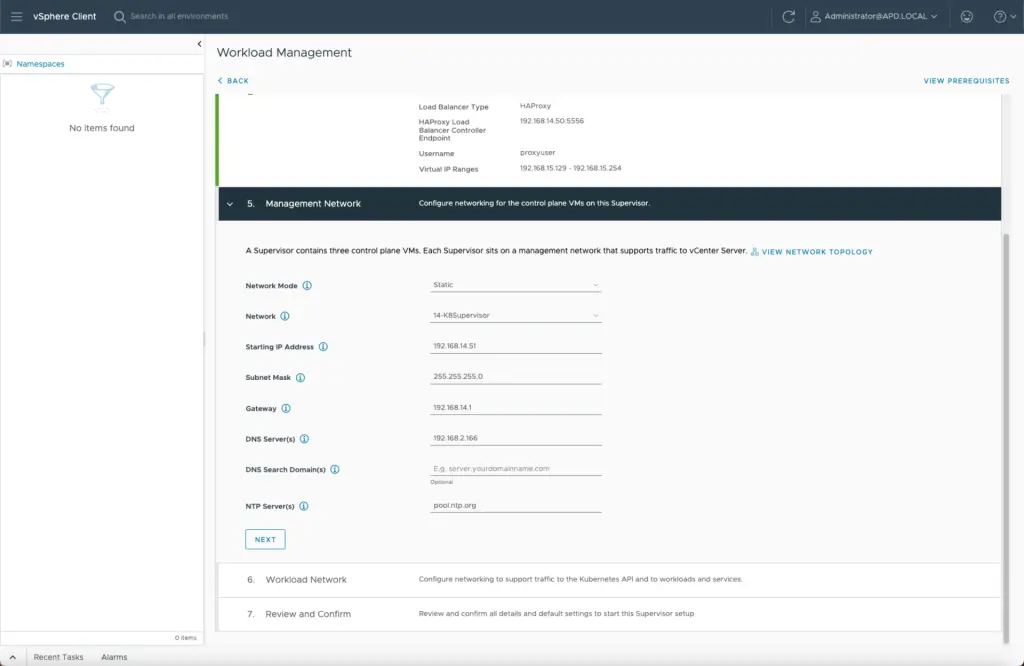
Next, you’ll use your planned management network
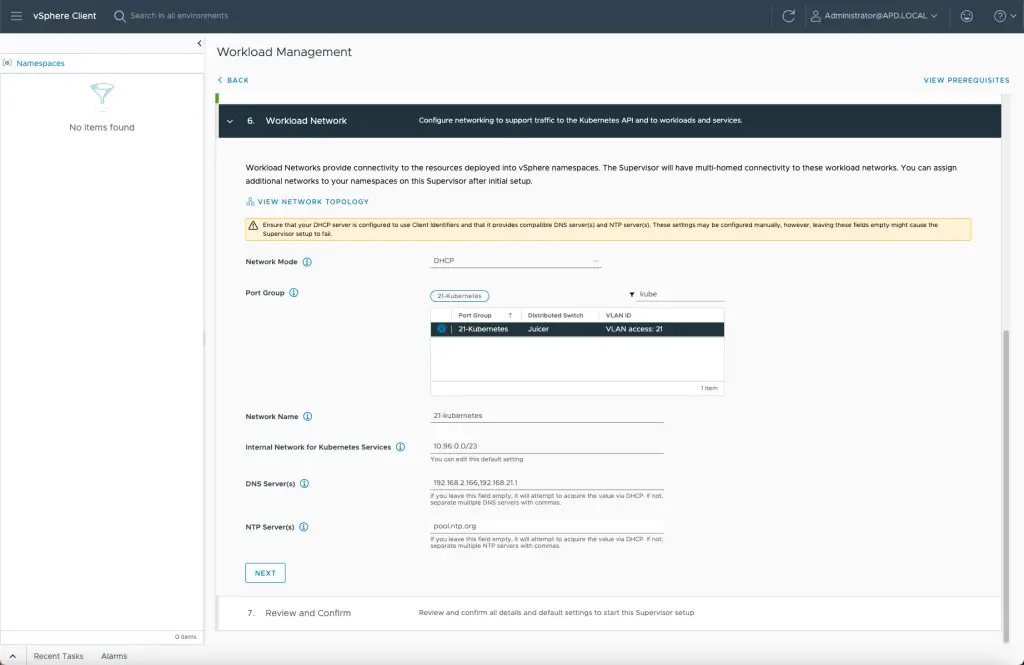
Lastly, your workloads will need a place to run. This is where the Kubernetes API, workloads and services will run – but the API needs to be accessible to interact with other services. Behind the covers, the Kubernetes cluster will run in its own private IP space, that is not of real concern.
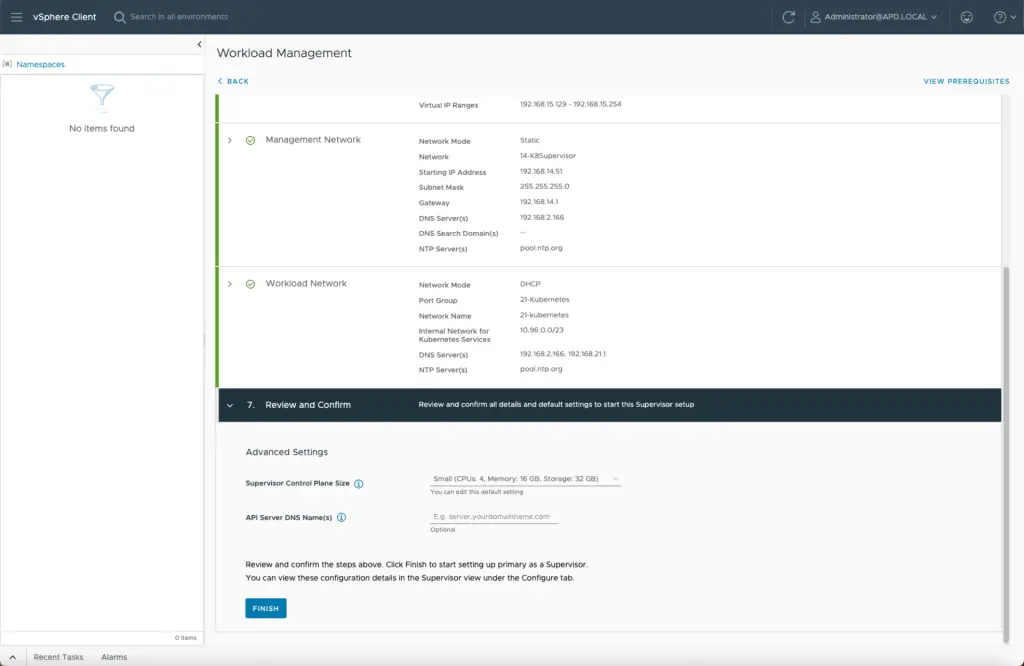
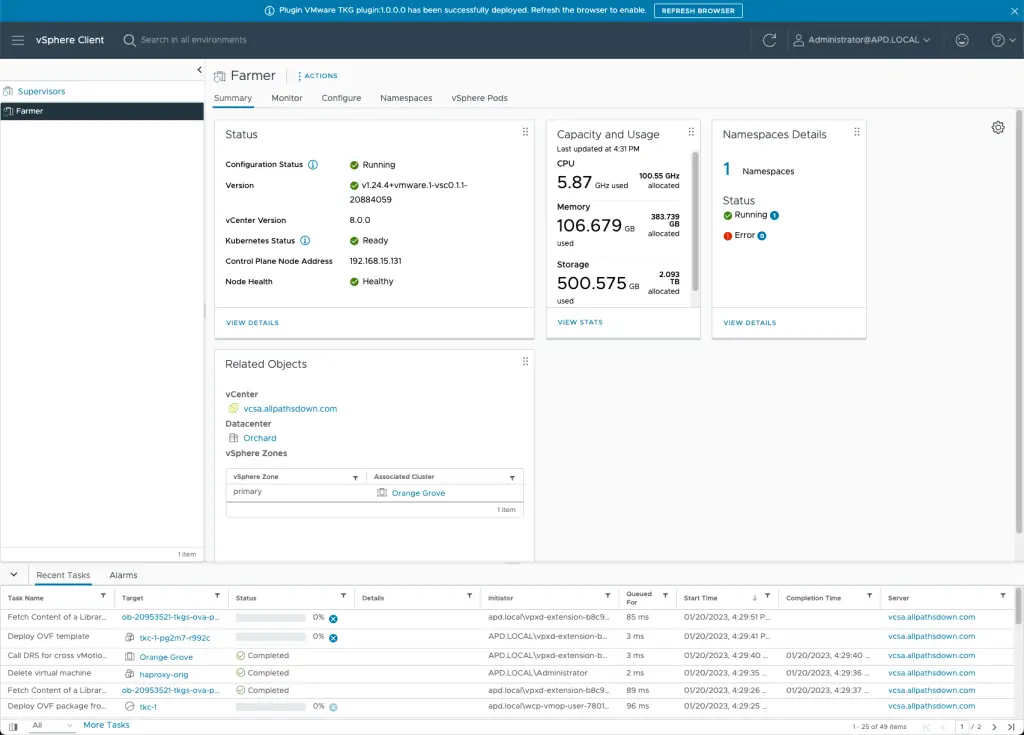
Deploy.

Monitor.
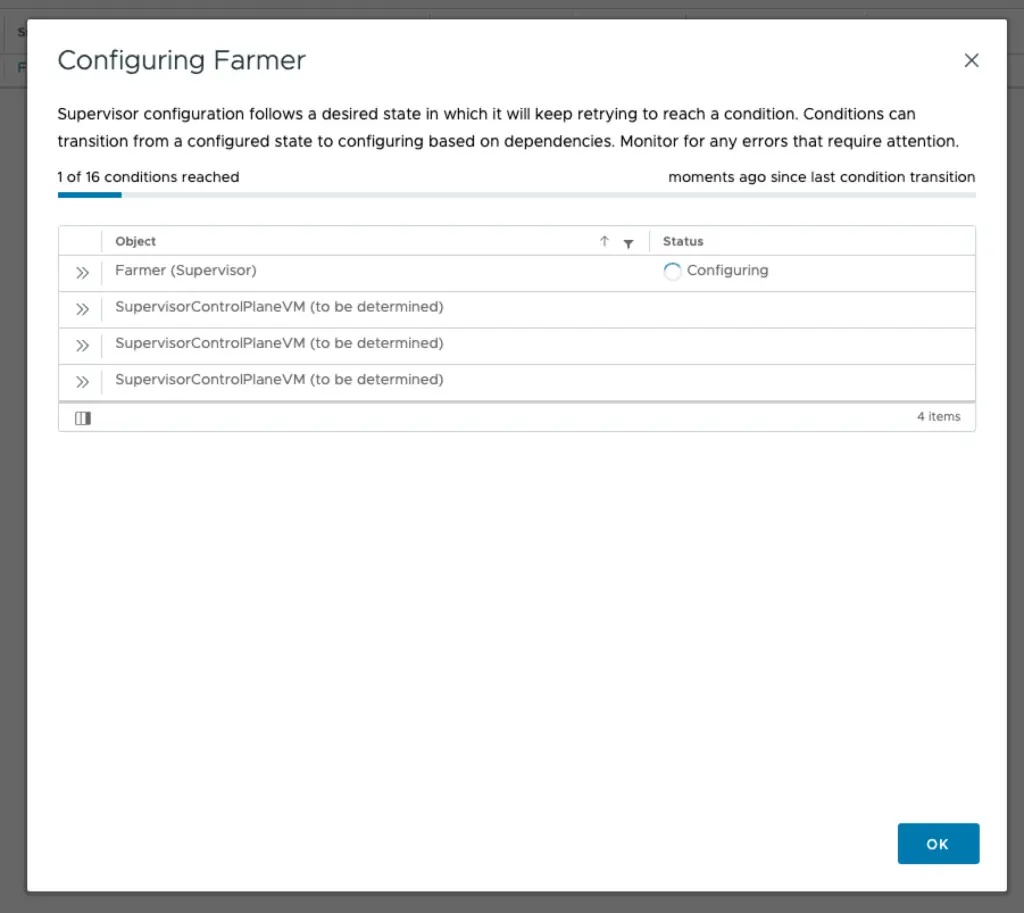
Done.