![]() New job, new lab. I’ve been rebuilding our lab environment and for the first time, I have enough hardware to really give VSAN a whirl. I have 6 hosts with Intel Xeon E5645 procs and 4 x 400GB SSD’s in each server.
New job, new lab. I’ve been rebuilding our lab environment and for the first time, I have enough hardware to really give VSAN a whirl. I have 6 hosts with Intel Xeon E5645 procs and 4 x 400GB SSD’s in each server.
Being a lab environment, I knew I wanted to deploy a different SDS solution. I’ve worked with HPE’s StoreVirtual in the past and I was able to do a hands-on POC with an EMC ScaleIO SDS earlier this year. VSAN, however, had been elusive for me, so I took this opportunity to work through that solution.
The biggest hurdles in building VSAN is the underlying hardware. The software, as with most of VMware’s solutions, is dead simple to configure and make the solution work. Even though I have good hardware, I’m not strictly compatible per the HCL, but this doesn’t keep VSAN from working very well.
But my SSD’s show up as HDD’s
Back to the hardware – these older IBM System x’s – did not support JBOD passthrough on the RAID controllers. While it was a pain to setup, there is a workable solution. In the RAID controller, you have to build a RAID disk in a RAID 0 configuration for each drive and then present it out as a virtual drive. This is far from ideal, but works in a lab. The one problem it creates is masking the SSD capabilities from ESXi. ESXi sees these virtual disks as hard drives instead of solid state.
Fortunately, a little ESXCLI magic and you can override this – first you have to list all the local disks – the exact command will vary a little based on your hardware, but since all these were connected to my IBM servers, I was able to use a grep for IBM.
<code>esxcli storage core device list | grep IBM</code>
You just need to figure out what identifies your local disk type and then grep for the same thing.
For the rest, I followed the instructions in this VMware tech document – https://pubs.vmware.com/vsphere-55/index.jsp?topic=%2Fcom.vmware.vsphere.storage.doc%2FGUID-99BB81AC-5342-45E5-BF67-8D43647FAD31.html (these instructions work with 6.0 and 6.5, even though the document is for 5.5).
<code>esxcli storage nmp satp rule add -s SATP –device device_name –option=”enable_ssd”</code>
Lastly, you need the system to ‘reclaim’ the disk with the new policy.
<code>esxcli storage core claiming reclaim –device device_name</code>
Now the easy part
VSAN is built-in to vSphere 6.0 and 6.5, so via the vSphere Web Client, so setup is very simple. Instead of step-by-step, these instructions are the outline of steps to setup your own VSAN.
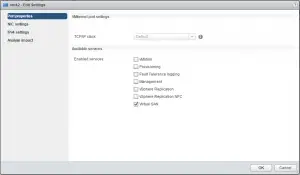
- On each of your nodes to be used for VSAN, setup 10Gig VMKernel adapters and check the box for Enable Virtual SAN. You need at least one and I decided to re-use my iSCSI connections for the lab. [Someone familiar with best practices, comment is this is bad idea].
- In the vSphere Web Client, navigate to your cluster object, navigate to the Configure tab for it and then select General under Virtual SAN.
- Enable virtual SAN > click Edit… next to Virtual SAN and then check the box to “Turn ON Virtual SAN.” [as a side note, I’ve always loved how easy HA clustering is to enable, and Virtual SAN is just as simple – although you have a little config left to complete]
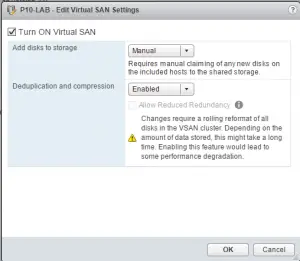
I kept the default of adding disks Manually to my installation. If you have JBOD passthrough and your SSD’s show up as SSD’s automatically, go for Automatic disk add… - Next step is adding disks, just a simple – go to Disk Management, click the Claim Disks button and then for each host, choose how you’d like to adopt the disks. For my systems, I chose Capacity at the host level, which is inherited to all disks in the host, then I went back and chose one Cache disk per host. Click OK and your VSAN is building.
You’ll see a number of tasks in the background under Recent Tasks.
Last, you’ll see a new Datastore presented from your VSAN which is an aggregate of all the disks and groups from all your participating systems.
One last tip, go ahead to the Monitor tab and then go to Performance. Click on Virtual SAN – either option – and then enable performance monitoring.
Why VSAN for the lab?
I had several reasons…
- No drive penalty… With solutions like HPE’s StoreVirtual and EMC’s ScaleIO, you must have a VM ‘controller’ that is the main connection to your local storage and presents it up to servers for consumption. StoreVirtual has a virtual appliance and ScaleIO has its SDS in virtual appliance form – but with a VM, you have to store the base VM image somewhere, meaning one less drive to be setup in your drive pool.
- It is tightly integrated into vSphere, meaning less management points.
- I have entitlements for my lab via the vExpert program, so price is not an issue. For others, check out VMUG Advantage – while not free, it is a great value for your home lab.